
Troubleshoot
Melt Index
Melt Index
Melt index test method
Melt Mass Flow Rate (MFR)
Melt Volume Rate (MVR)
This test is to determine the Melt Volume Rate (MVR) of the thermoplastic sample under certain conditions.
This test is suitable for thermoplastic material.
1 Definition
MVR is defined as the weight of the material passing through a standard exit every 10 minutes, under a set temperature and pressure.
2 Sample and Process
2.1 Shape of Sample Pellets, Powder, Chips, or other shapes.
2.2 Pre=Drying Moisture-absorbing samples must be pre-dryed accordingly.
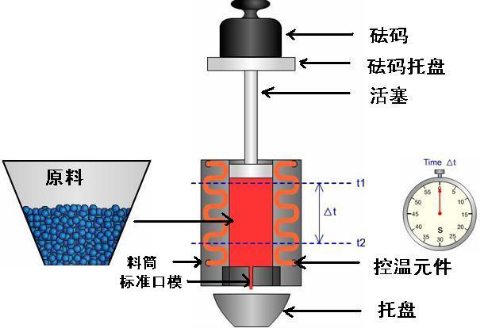
3 Apparatus
Testing apparatus is as shown below.
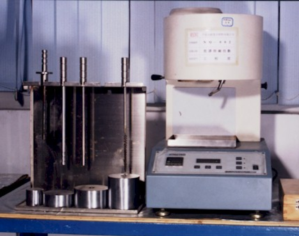
Actual testing apparatus is as shown below.
3.1.1 Hopper
Round hopper is made of steel (hardness >300Hv). Inner Diameter (9.550±0.025mm), Length (150-180mm), Inside Wall Cleanliness >▽8.
3.1.2 Stopper
Hardness of the stopper should be slightly less than that of the Hopper. Length of it should be longer than hopper length. Stopper diameter is 9mm, Head of the stopper is 6.35±0.10mm, with a diameter smaller than that of the hopper by 0.075±0.015mm. Inside Wall Cleanliness >▽8. The inverted angle at the bottom of the stopper should have diameter of 0.4mm, and the upon edge should be smoothed.
3.1.3 Standard Exit
Exit should be made from carbonized Tungsten, paired with the Hopper to creat room. Acceptable diameter includes 2.095±0.005mm and 1.180±0.010mm. Inside Wall Cleanliness >▽8, and height is 8.000±0.025mm.
3.1.4 Weight pressure
Weight pressure is the total of the Weight, the Tray and the Stopper, with the overall accuracy at ±0.5%.
3.1.5 Temperature Control Device
Apparatus has a temperature measuring device to ensure temperature fluctuationg at ±0.5℃. Oven temperature is measured 10.0mm from Exit.
3.2 Other Devices
3.2.1 Cutting tools such as scrappers, or flexible steel plate.
3.2.2 Weigh with sensitivity of 0.001g
3.2.3 Timer accuracy to 0.1s.
4 Temperature Standardization
Temperature device must be tuned before every tests, and before every temperature change. First, adjust the heat control system until the desired temperature is reached. Meanwhile, the thermometer is inserted into the hopper until temperature is reached. Then, take out the thermometer and put the sample material into the hopper and pressed firm, inserting the thermometer again. After the material is melted, thermometer is again inserted into the melted material 10mm from the exit. After 4 minutes, standardize the 2 thermometers.
5 Testing Conditions
| Number | Standard Exit (inner diameter mm) | Testing Temperature | Exit | Weight |
| 1 | 1.180 | 190 | 46.6 | 2.160 |
| 2 | 2.095 | 190 | 70 | 0.325 |
| 3 | 2.095 | 190 | 464 | 2.160 |
| 4 | 2.095 | 190 | 1073 | 5.000 |
| 5 | 2.095 | 190 | 2146 | 10.000 |
| 6 | 2.095 | 190 | 4635 | 21.600 |
| 7 | 2.095 | 200 | 1073 | 5.000 |
| 8 | 2.095 | 200 | 2146 | 10.00 |
| 9 | 2.095 | 220 | 2146 | 10.00 |
| 10 | 2.095 | 230 | 70 | 0.325 |
| 11 | 2.095 | 230 | 258 | 1.200 |
| 12 | 2.095 | 230 | 464 | 2.160 |
| 13 | 2.095 | 230 | 815 | 3.800 |
| 14 | 2.095 | 230 | 1073 | 5.000 |
| 15 | 2.095 | 275 | 70 | 0.325 |
| 16 | 2.095 | 300 | 258 | 1.20 |
* Load unit N,1kgf=9.8N.
MVR Testing Condition for various material
| material | condition(℃/kg) |
| Polyoxymethylene(POM) | 190/2.16 190/1.05 |
| Acrylic | 230/1.2 230/3.8 |
| Acrylonitrile Butadiene Styrene(ABS ) | 200/5 230/3.8 220/10 |
| PC/ABS alloy | 260/5 260/2.16 260/3.8 240/5 230/3.8 |
| Nylon(PA) | 275/0.325 235/1.0 235/2.16 |
| 235/5.0 275/5.0 | |
| Polyethylene(PE) | 125/0.325 125/2.16 2.5/1.2 |
| 190/0.325 190/2.16 190/21.6 | |
| 190/10 310/12.5 | |
| Polycarbonate(PC) | 300/1.2 |
| Polypropylene(PP) | 230/2.16 190/5.0 |
| Polystyrene(PS) | 200/5 230/1.2 230/3.8 190/5.0 |
| Polyparaben | 250/2.16 210/2.16 285/2.16 |
| Polyphenylene sulfide(PPS) | 315/5 |
| SAN | 220/10 230/10 230/3.8 |
| Thermoplastic elastomer(TEO/TPO) | 230/2.16 |
| Polyethylene terephthalate(PBT) | 250/2.16 210/2.16 |
6 Testing Procedure
6.1 Pre-dying the sample material
6.2 Set the apparatus at level.
6.3 Put the standard exit into the hopper, insert the stopper and start the heating until desired temperature is reached. Maintain temperature for at least 15 minutes
6.4 Put the material into the hopper accordingly to the below table
Time elapsed between material insert and testing
| MVR (g/10min) | Material Weight (g) | Elapsed Time (s) |
| 0.1~0.5 | 3~4 | 120~240 |
| >0.5~1.0 | 3~4 | 60~120 |
| >1.0~3.5 | 4~5 | 30~60 |
| >3.5~10 | 6~8 | 10~30 |
| >10~25 | 6~8 | 5~10 |
After material is inserted, stopper is put in to close. Within 1 minute, add weigh according to the pre-selected testing condition.
Note: if MVR is higher than 10g/10min, then pre-heating will cause material loss. Under this circumstance, pre-heat can be done with little or no weigh. Weigh can be introduced when pre-heating is done.
6.5 After 4 minutes of pre-heaing, when temperature is back to normal, stopper should be pushed by hand to the lower circle mark 5-10mm from the exit. This should take no longer than 1 minute. When stopper is lowered to the mark, the excess material should be cut from the sample, according to the time interval set in the above table. Keep 3 consecutive bubbles-free sample. Stop when the stopper is level to exit.
Note:① For material susceptible to oxidation, nitrogen can be used to clean the hopper.
② For material with MVR at 25g/100min or above, may use an exit with a smaller diameter
③ Sample plate should be cut between 10-20mm, but the specified elapsed time should be made priority.
6.6 After sample is cooled, it should be placed on the weigh for measuring
6.7 After each testing, the mold surface, hopper and stopper should be wiped clean. Holes should be cleaned with the proper copper wire or nails, and then cleaned with clothes.
7 Calculation
① The melt (mass) flow rate is calculated according to the formula:

formula:
MFR —— The melt flow rate,g/10min;
m —— The arithmetic mean of the quality of cut samples,g;
t —— Bar time interval, s The sample result shall be two significant digits.
② Melt (volume) flow rate is calculated according to formula:

formula:
MVR —— melt flow rate, cm3/10min;
The result of the sample is two significant digits.
Copyright ©2020 Polymer Solutions Limited 粤ICP备2020087627号